Block a malicious email address in cPanel

Log into the cPanel account and scroll down to the “Email Management Tools” box and enable SpamAssassin.

Click on “Configure SpamAssassin” button and set the score to 5 or 6. The greater the number the more SPAM you could receive.

Click on “save”.

You can also configure Mozilla Thunderbird to accept SpamAssasin’s headers to help it identify SPAM. Set it on your account settings on a “per account” basis.

Set filters in “Account Level Filtering”

You can add the filter for a specific email address from “cPanel>> Mail>> User Level Filtering” option to DISCARD the incoming emails from that malicious email address you want to block. Here are the steps to set a filter.

1. login to cPanel and go to “cPanel>> Mail>> User Level Filtering” option.

2. Add the following filter for your domain email accounts.

Rules:

Select “From” from drop down menu, then you’ll need to select “Contains” from the drop down menu.

Actions:

Enter the email address you want to block” and click on Activate button.

This filter will block one particular email address from coming into the email address on your domain email address\es and at the same time, your email address will not send any bounce back email message to the blocked email address.

How to disable Dr.Web notifications in Plesk

You can edit /etc/drweb/drweb_qmail.conf or /etc/drweb/drweb_handler.conf using a text editor like nano or vi to eliminate receiving notification messages when Dr. Web has an issue:

[VirusNotifications]
SenderNotify = no
AdminNotify = no
RcptsNotify = no

Then restart Dr. Web with:

# /etc/init.d/drwebd restart

Installing Magento through Installatron requirements missing error in WHM

Installing Magento through Installatron requirements missing error:

Requirements:
php-intl-version-minimum v1 (detected: OFF) php extension
php-memory-limit 128MB (detected: 32MB)

You will need to install php-intl-version-minimum in EasyApache:

Home >> Software >> EasyApache then click on customize

Then under PHP Extensions you will need to find php-intl-version-minimum and click the tab to install.

Once you have done this you will need to click on the “Review section” then click the “Provision” button at the bottom of the page.

Then for the php-memory-limit t you will need to go to:

Home >> Software >> MultiPHP Manager to see which PHP version is installed.

Now click on “MultiPHP INI Editor” and select that PHP version in the drop down box.

Find “memory_limit” and increased to 128M and then click on “Apply” at the bottom of the page.

Then run the Magento installation through Installatron again.

Roundcube – IMAP Server dropping the connection

When trying to log into your email account via the Roundcube webmail client and IMAP keeps dropping the connection you can fix this by:

  • #tail -20 /var/cpanel/roundcube/log/errors  —>To check the logs
  • #/etc/init.d/courier-imap restart                       —>To restart the IMAP service
  • #/scripts/courierup –force                                  —>To update the IMAP server

If the issue is still not resolved then you may need to change the permissions of the mail directory with the command below but make sure the username is the username from cPanel:

  • #chown -R username:mail /home/username/mail
  • #chown -R username:mail /home/username/etc


WHM/cPanel -Permission denied (publickey,gssapi-keyex,gssapi-with-mic)

When trying to log into a server with WHM/cPanel via SSH and you get this error:

Permission denied (publickey,gssapi-keyex,gssapi-with-mic)

This will be because password authentication is disabled in the sshd_config file

To resolve this you can log into WHM and enable the password authentication.

  • WHM >> Security Center >> SSH Password Authorisation Tweak

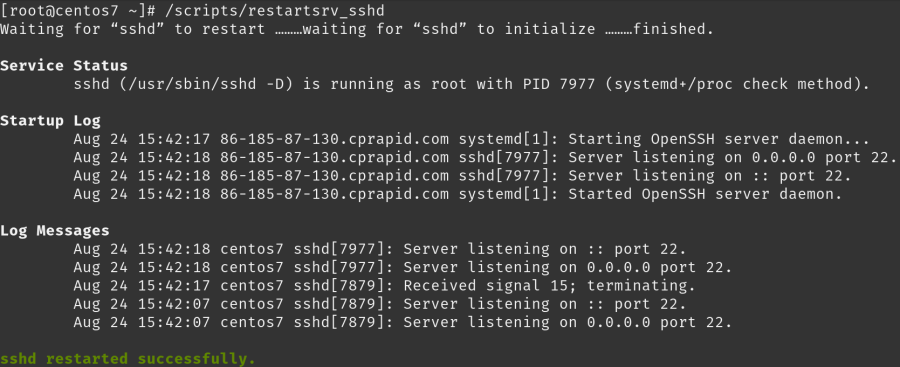
Then restart the SSH service:

cpanelssh

WARNING: RESTRICT_SYSLOG is disabled. See SECURITY WARNING in Firewall Configuration in WHM

When looking at “ConfigServer Security & Firewall” in WHM it gives this error at the top in a yellow box WARNING: RESTRICT_SYSLOG is disabled. See SECURITY WARNING in Firewall Configuration

I resolved this by:

  • Setting RESTRICT_SYSLOG to 3 in the drop down box

This is a description of each number in the drop down box:

# 0 = Allow those options listed above to be used and configured
# 1 = Disable all the options listed above and prevent them from being used
# 2 = Disable only alerts about this feature and do nothing else
# 3 = Restrict syslog/rsyslog access to RESTRICT_SYSLOG_GROUP

Password for the admin account in Plesk

Plesk for Linux/Unix:

Plesk Onyx:

/usr/local/psa/bin/admin --get-login-link

Plesk versions 10.x and above:

/usr/local/psa/bin/admin --show-password
If you need to change the password use the following:
/usr/local/psa/bin/init_conf -u -passwd

For Plesk versions up to 9.x:

The Plesk admin password is stored in a hidden file on the server. Use this command to get it:

cat /etc/psa/.psa.shadow

Plesk for Windows:

As well as the the password reminder option available on the Plesk login screen, you can use theplesksrvclient.exe utility to set up a new password or retrieve an existing one.
You can set up a new password by running the following command:
"%plesk_bin%\plesksrvclient" -set
You can also retrieve the current password by running the utility with the following command:
"%plesk_bin%\plesksrvclient" -get
To retrieve the password in the command line, use the “-nogui” option:
"%plesk_bin%\plesksrvclient" -get -nogui > plesk_password.txt
After that, you can find the retrieved Plesk password in the plesk_password.txt file.
To view the password in the command line:
"%plesk_bin%\plesksrvclient" -get -nogui | more

Installing Plesk in Debian manually

First, the Plesk Debian repository should be added to the sources list. The link to the Plesk Debian repository is http://autoinstall.plesk.com/ to list the versions.

Then add the repository record for your desired Plesk version into “/etc/apt/sources.list.” For example, you would use the below line for Plesk 9.5.3 Etch:deb http://autoinstall.plesk.com/PSA_9.5.3/ etch all

Next, update the cache packages list:

# apt-get update

Now you can install Plesk, use the below line to install the base Plesk package:

# apt-get install psa

Installing Plesk in CentOS 7

One-Click Installer:

The Plesk one-click installer is a script that downloads itself and determines the correct Plesk version for your OS. You won’t accidentally pick the wrong version for your distribution. Paste this and the installer will download the latest version of Plesk.

# wget -O – http://autoinstall.plesk.com/one-click-installer | sh

If you get an error message, wget may not be installed. Install wget like this:

# yum install wget

To download older versions of Plesk you can download the one-click-installer file and run it with the option –show-all-releases. This will give you the option to specify your desired Plesk version with –select-release-id. For more information, run the file with the –help option.

Once finished the installer will give you a URL to login with – usually consisting of your IP, like https://127.0.0.1:8443

Opening Ports for Plesk:

On CentOS 6 and prior the firewall rules were set via iptables. This service is gone and has been replaced with firewalld in CentOS 7. We still need to open ports to speak to Plesk via a browser. The two important ones to open here are 8443 and 8447:

# firewall-cmd –zone=public –add-port=8443/tcp –permanent
# firewall-cmd –zone=public –add-port=8447/tcp –permanent
# firewall-cmd –reload

The –permanent option makes these rules “stick” upon restart.

These are not the only ports Plesk needs to function, for a full list please see this KB article:

Add Atomic Repo Power (optional):

If you’d like to supercharge your server, now’s a good time to install the Atomic repos. These will give you access to many additional tools such as pre-compiled OSSEC HIDS and additional PHP versions:

# wget -q -O – http://www.atomicorp.com/installers/atomic.sh | sh

Logging in for the first time:

With your dedicated IP handy, the installer script will have given you something like https://127.0.0.1:8443. Navigate there and be presented with the Plesk login screen.

The first time you login to Plesk you can do so with your server root credentials. This even works on subsequent sessions, however Plesk creates an admin user for which you will specify the password during your first session.

It is strongly recommended that you use that admin user for Plesk administrative tasks. You can also create additional administrators in Plesk once you’re up and running – so there’s no need to share your super secret password with colleagues and clients.

Correcting your IP address (optional):

It can happen that Plesk does not detect the correct IP address on your server. This was never the case in CentOS 6, but I’ve noticed this in CentOS 7. In my case the Plesk installer thought that the local loopback address was my main one (127.0.0.1) – which of course it was not.

You can usually correct this on first login, but just in case you need to do this from the command line, check this helpful KB article:

License Key and Additional Components:

You need a license to operate Plesk. You’ll get this either from your server provider (if Plesk is part of your deal), or you can buy one directly from Parallels. You can also run Plesk as a 14 day trial version. If you don’t enter this you can still use the Plesk interface but you’ll be limited to a single domain and several options are unavailable.

In case you’re missing menu items that you had expected to be there, it’s probably a license issue.

I find it helpful to head over to Tools and Settings (or the Server Tab) – Plesk – Updates and Upgrades and install several additional components, such as

  • Health Monitor
  • Migration Manager
  • Firewall (under Additional Plesk Extensions)
  • Watchdog (under Additional Plesk Extensions)
  • Spam Assassin (under Mail hosting features)
  • Kapersky Anti Virus (under Mail hosting features)

You can also install Fail2ban from this menu if this is also needed to try and prevent brute force attacks.