How to install VMWare Player in Debian 8

First of all you will need to download the installation files from VMware official site https://my.vmware.com/web/vmware/free#desktop_end_user_computing/vmware_workstation_player/

Open the terminal and go to the directory that the bundle has been downloaded to:

# cd ~/Downloads

Then you will need to make sure the permissions are correct by running the following command:

chmod +x VMware-Player-12.0.0-*.bundle

Then you will need to run the installer using the command:

# sudo ./VMware-Player-12.0.0*.bundle

For the free version you just need to add an email and then run through the installation.

How to setup software RAID 1 in Debian/Ubuntu

When getting to the partitioning disk section of the OS installation you will need to select:

  • Manual” under the Partitioning Method
  • On the next screen make sure both disks are visible and select the first disk and press Enter
  • A message may pop up warning you that you are about to create a new partition that will destroy any existing partition. Choose “Yes” to proceed.
  • You will notice that it will create a new partition at the bottom of the hard disk. Choose the new partition and hit Enter
  • Select the Create New Partition
  • When creating the partition for boot, just type 700MB or 1GB in the line depending on which server.
  • Choose “Primary” and press enter then “Beginning” and press Enter
  • On the next screen, select “Use As” and hit Enter
  • Choose the “Physical Volume For RAID” option
  • Make sure that the Bootable Flag is tuned On
  • Choose “Done Setting Up The Partition” to save the new partition
  • You will be taken back to the first screen. Next step is to choose the next free space and hit Enter
  • You will do the same as above but this is for swap so assign 1.5 x RAM in server
  • Then the left over space do the same and this is for the root partition
  • Now moving on to the second hard disk for the partitioning. Hit Enter and do the same partitioning with the 2nd hard disk to look like the first
  • After the 2nd hard disk has been partitioned, the overall partition configuration will be completed. So now move the selector to “Configure Software RAID” and hit Enter
  • Select “Yes” to accept the new partition changes
  • Now we will group the RAID hard disk. Select the “Create MD Device” option
  • Choose “RAID1
  • Leave the default number 2 for the number of RAID devices and select “Continue
  • On the next screen leave it as zero and select “Continue
  • Now select the SDA1 and SDB1 as we are creating the RAID for /boot
  • When it has been done, choose “Finish” to save the new RAID partition
  • Do the same for swap but select SDA2 and SDB2
  • Do the same for root but select SDA3 and SDB3
  • The initial software RAID is completed what’s left is to assign each RAID partition its role. Now select the RAID partition Device #0 for /boot setup
  • Choose the “Use As” and hit Enter
  • Choose the EXT3 Journaling File System (or EXT4 for Ubuntu) and hit Enter
  • Move the selector to the Mount Point: and hit Enter
  • Now select the /boot and hit Enter
  • Select the “Done Setting Up The Partition” to complete the /boot partition setup
  • Do the same for the swap and root paritions
  • Finally select the “Done Setting Up the Partition” to complete the procedure
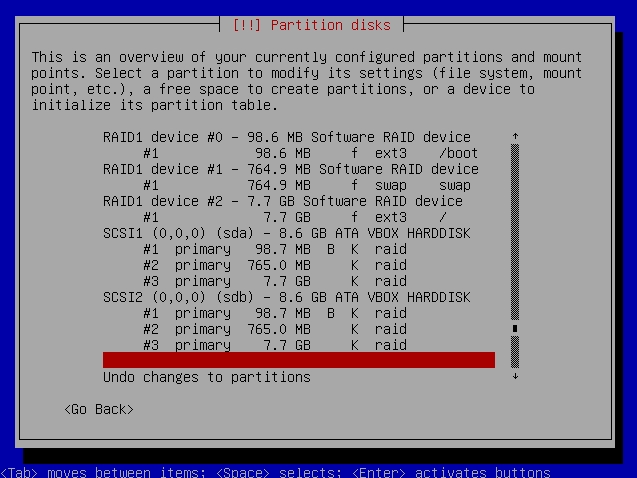
  • The final partition should be like the picture below.
  • Once confirmed, move the selector to the “Finish Partitioning And Write Changes To Disk” and hit enter

raid1

How to install Thunderbird in Debian 8

First you will need to visit the Mozilla website to download the latest version of Thunderbird here: https://www.mozilla.org/thunderbird/

This will download the file for example: thunderbird-45.5.1.tar.bz2 then we need to move the file into the /usr/ directory:

# sudo mv ~/Downloads/thunderbird-45.5.1.tar.bz2 /usr/

# cd /usr/

# sudo tar xvf thunderbird-45.5.1.tar.bz2

Once this has completed extracting you will then need to press the key in between ctrl & alt, which is usually the Windows key.

Then in the search box type main menu and press enter. Then in the main menu click on “Internet” which is on the left side bar and then click “New item” on the right side bar.

Now on the top left side there is an empty icon button press on that and navigate to:

Computer > usr > thunderbird > chrome > icons > default and select the “default256.png”

In the name section type “Thunderbird” and for the command section type “/usr/thunderbird/thunderbird-bin” and then click on “Ok”

Now that Thunderbird is installed and you have created a launcher you can press the Windows key and search for Thunderbird or even add it to your favourites.


Roundcube – IMAP Server dropping the connection

When trying to log into your email account via the Roundcube webmail client and IMAP keeps dropping the connection you can fix this by:

  • #tail -20 /var/cpanel/roundcube/log/errors  —>To check the logs
  • #/etc/init.d/courier-imap restart                       —>To restart the IMAP service
  • #/scripts/courierup –force                                  —>To update the IMAP server

If the issue is still not resolved then you may need to change the permissions of the mail directory with the command below but make sure the username is the username from cPanel:

  • #chown -R username:mail /home/username/mail
  • #chown -R username:mail /home/username/etc


WHM/cPanel -Permission denied (publickey,gssapi-keyex,gssapi-with-mic)

When trying to log into a server with WHM/cPanel via SSH and you get this error:

Permission denied (publickey,gssapi-keyex,gssapi-with-mic)

This will be because password authentication is disabled in the sshd_config file

To resolve this you can log into WHM and enable the password authentication.

  • WHM >> Security Center >> SSH Password Authorisation Tweak

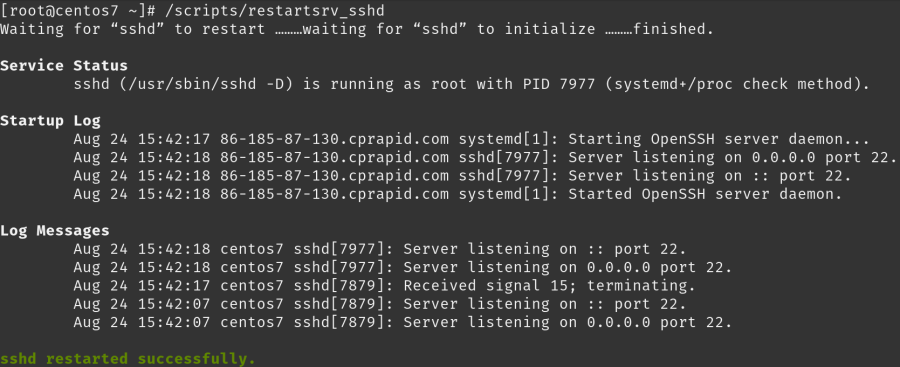
Then restart the SSH service:

cpanelssh

WARNING: RESTRICT_SYSLOG is disabled. See SECURITY WARNING in Firewall Configuration in WHM

When looking at “ConfigServer Security & Firewall” in WHM it gives this error at the top in a yellow box WARNING: RESTRICT_SYSLOG is disabled. See SECURITY WARNING in Firewall Configuration

I resolved this by:

  • Setting RESTRICT_SYSLOG to 3 in the drop down box

This is a description of each number in the drop down box:

# 0 = Allow those options listed above to be used and configured
# 1 = Disable all the options listed above and prevent them from being used
# 2 = Disable only alerts about this feature and do nothing else
# 3 = Restrict syslog/rsyslog access to RESTRICT_SYSLOG_GROUP

Find Out Hard Disk Details on Linux

The hdparm command provides a command line interface this command read / request identification information such as disk size, description and much more directly from the drive, which is displayed in a new expanded format.

To show this information use the following command:

hdparm -I /dev/sda

hdparm -I /dev/sdb

lshw Command

You need to install lshw command using your package manager. To display all disks and storage controllers in the system using the following the command:

lshw -class disk -class storage

Find out disks name only 

Use the following command:

lshw -short -C disk

smartctl Command

smartctl -d ata -a -i /dev/sda

Hardware Details without turning the server off

dmidecode is a tool for dumping a computer’s DMI table contents in a human-readable format.

To show just the memory information use the following command:

dmidecode –type memory

To show the memory information using the number use this command:

dmidecode 17

Here is a table of the types:

 Type   Information
—————————————-
0   BIOS
1   System
2   Base Board
3   Chassis
4   Processor
5   Memory Controller
6   Memory Module
7   Cache
8   Port Connector
9   System Slots
10   On Board Devices
11   OEM Strings
12   System Configuration Options
13   BIOS Language
14   Group Associations
15   System Event Log
16   Physical Memory Array
17   Memory Device
18   32-bit Memory Error
19   Memory Array Mapped Address
20   Memory Device Mapped Address
21   Built-in Pointing Device
22   Portable Battery
23   System Reset
24   Hardware Security
25   System Power Controls
26   Voltage Probe
27   Cooling Device
28   Temperature Probe
29   Electrical Current Probe
30   Out-of-band Remote Access
31   Boot Integrity Services
32   System Boot
33   64-bit Memory Error
34   Management Device
35   Management Device Component
36   Management Device Threshold Data
37   Memory Channel
38   IPMI Device
39   Power Supply

If you require further help you can use the following command:

man dmidecode

Install (LAMP) stack On CentOS 7

Install Apache

To install Apache run the following:

sudo yum install httpd

Once it installs, you can start Apache on your server using:

sudo systemctl start httpd.service

To test that the web server is working use:

http://your_server_IP_address/

If you see the Apache test page, then your web server is now correctly installed. Now enable Apache to start on boot using the following:

sudo systemctl enable httpd.service

How To Find your Server’s Public IP Address

If you do not know what your server’s public IP address is you can use:

ip addr show eno1 | grep inet | awk ‘{ print $2; }’ | sed ‘s/\/.*$//’ or curl http://icanhazip.com

Install MySQL (MariaDB)

MariaDB is a community-developed fork of the MySQL relational database management system. To install MariaDB use the following:

sudo yum install mariadb-server mariadb

After installation you start MariaDB with the following command:

sudo systemctl start mariadb

Run a simple security script that will remove some dangerous defaults by
running:

sudo mysql_secure_installation

It will ask for current root password so just press enter for none and then
it will prompt you to set a root password.

Then you want MariaDB to start on boot by using the command:

sudo systemctl enable mariadb.service

Install PHP

To install PHP you need to run the following:

sudo yum install php php-mysql

Once that is installed you will need to restart the web server using:

sudo systemctl restart httpd.service

Test PHP Processing on your Web Server

If you’re not running WHM/cPanel or Plesk then run:

sudo vi /var/www/html/info.php

Put this code into the empty file:

<?php phpinfo(); ?>

If youre running a firewall then you may need to run these commands:

sudo firewall-cmd –permanent –zone=public –add-service=http

sudo firewall-cmd –permanent –zone=public –add-service=https

sudo firewall-cmd –reload

To test this go to:

http://your_server_IP_address/info.php

Then if everything is ok then remove the php file using:

sudo rm /var/www/html/info.php

The reason this file is removed is because sometimes it can reveal information about the server we do not want unauthorised people to know.

Done LAMP is now installed on your server.